In today’s digital age, having a strong online presence is crucial for the success of any business. One effective way to enhance your visibility is by ensuring that your business is listed on popular online mapping platforms. Bing Maps is a widely used mapping service, and adding your business to it can help potential customers find you more easily. In this guide, we’ll walk you through the step-by-step process of adding your business to Bing Maps.
Step 1: Create or Claim Your Business Listing
The first step in getting your business on Bing Maps is to log into your Bing Places account. If you don’t have an account, Bing makes it easy to create an account with your existing Google or Facebook accounts. After you’re logged in, you’ll be able to import your business profile from Google Business Profile or add your business manually.
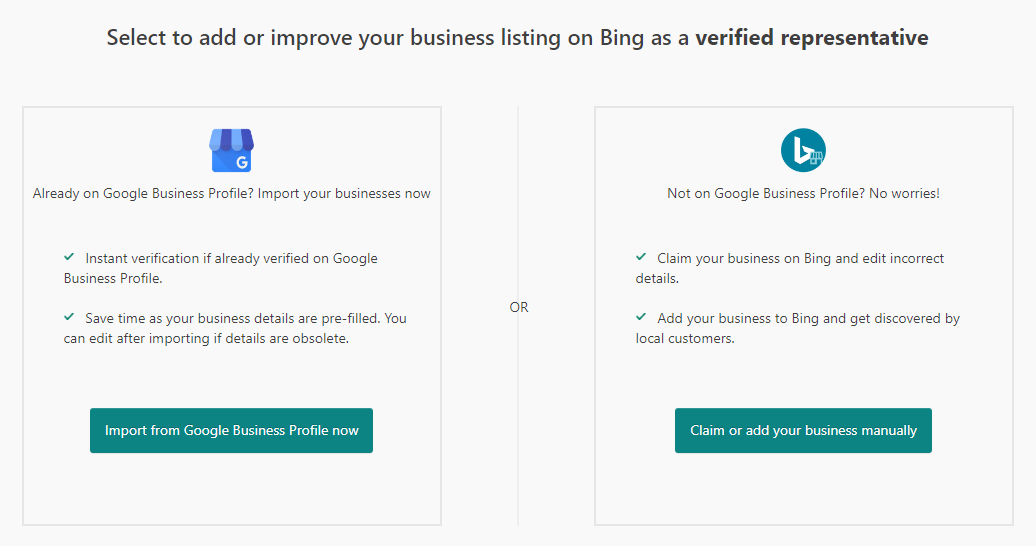
If you don’t have a Google Business Profile (or haven’t claimed it), you’ll want to “claim or add your business manually.” You’ll also want to learn more about BizIQ’s GBP Setup Services. Getting your business on the map, whether it’s Google Maps or Bing Maps, is crucial to Local SEO.
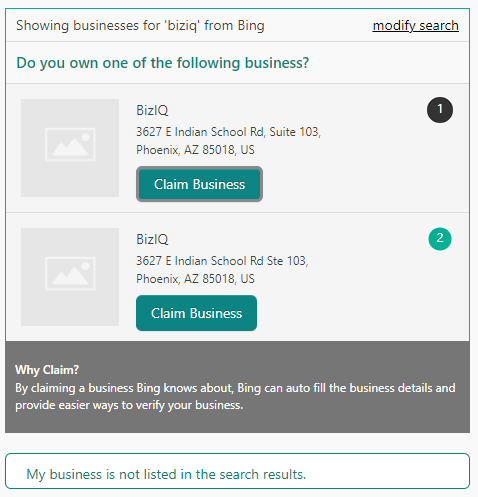 Through the manual process, you’ll be prompted to search for your business. There’s a good chance that Bing has already created a listing for your business. It may not be accurate. There may be duplicates. Don’t worry! After claiming your business, you’ll be able to update it as needed.
- If your business is not already listed, continue to Step 2.
- If your business is listed, jump to Step 3.
Step 2: Enter Business Details
After signing in, you’ll be prompted to enter your business details. Make sure to provide accurate and up-to-date information, including your business name, address, phone number, website, and business hours. This information will help potential customers learn more about your business and find it easily on Bing Maps.
Step 3: Verify Your Business
To maintain the accuracy of its listings, Bing Places requires businesses to verify their information. There are several verification methods available, including phone verification and postcard verification.
- Phone verification is the quicker option, where Bing Places will call the phone number associated with your business to provide a verification code.
- If you prefer postcard verification, Bing will mail a postcard to your business address with a code to enter on the website.
Step 4: Add Photos and Additional Details
Enhance your business listing on Bing Maps by adding high-quality photos that showcase your products, services, and the overall atmosphere of your establishment. Visual content can make your listing more appealing to potential customers. Additionally, take advantage of the opportunity to provide more details about your business, such as accepted payment methods, parking availability, and any special attributes that set your business apart.
Step 5: Optimize for Keywords
To improve the discoverability of your business on Bing Maps, optimize your listing with relevant keywords. Think about the terms potential customers might use when searching for businesses like yours, and incorporate them naturally into your business description. We also recommend conducting some keyword research. There are several free keyword research tools that can help you identify keywords that best align with your business. Learn more about keyword research for small businesses.
Step 6: Monitor and Respond to Reviews
Customer reviews play a significant role in influencing potential customers. Encourage your satisfied customers to leave positive reviews on your Bing Maps listing – just as you should encourage reviews for your Google Business Profile. Additionally, be proactive in responding to both positive and negative reviews. This shows that you value customer feedback and are committed to providing excellent service.
Step 7: Keep Information Updated
As your business evolves, make sure to keep your Bing Maps listing up-to-date. If there are any changes to your business hours, location, or contact information, promptly update your listing on Bing Places. This ensures that potential customers receive accurate information when they search for your business on Bing Maps.
Step 8: Explore Additional Bing Maps Features
Bing Maps offers various features that can further enhance your business listing. Take advantage of tools like the “Get Directions” feature, which helps customers easily navigate to your location. Additionally, consider incorporating Bing Maps into your website or app using the Bing Maps API for a seamless user experience.
Bing Maps Optimization Services
Adding your business to Bing Maps is a simple yet powerful way to increase your online visibility and attract local customers. By following the steps outlined in this guide, you can ensure that your business is accurately represented on Bing Maps, making it easier for potential customers to find and choose your products or services. Here at BizIQ, we understand the importance of a robust online presence for your business. Whether you need help with your Bing Maps listing or Bing Ads, our team is here to help. Request a free marketing consultation today.